


Step-by-Step Guide to Slab Leak Detection with Advanced Tools
Discover a step-by-step guide to slab leak detection using advanced tools. Learn from my personal experience with tips, mistakes to avoid, and expert advice.

Slab leaks are sneaky. One day, you're walking barefoot across the living room andsquishyour socks are mysteriously damp. Thats exactly what happened to me, and it launched me into a crash course on slab leak detection. Trust me, if you suspect a slab leak, the faster you act, the better.
Heres a step-by-step guide based on my experience, plus some pro tips and common mistakes to help you get to the bottom of things, without digging up your entire floor.
What Is a Slab Leak, Anyway?
A slab leak occurs when the plumbing beneath your concrete foundation starts leaking. Since its hidden under your house, detecting it can feel like solving a mysteryunless youve got the right tools.
Step 1: Know the Warning Signs
In my case, I noticed:
-
Warm spots on the floor
-
Higher-than-normal water bills
-
Low water pressure
-
A faint sound of water running, even when everything was off
If you're seeing any of these, dont shrug it off.
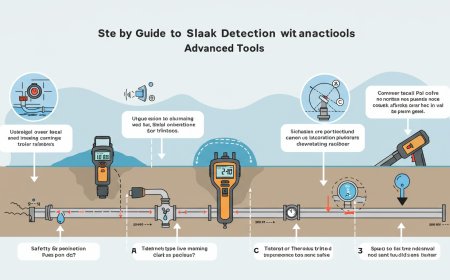
Step 2: Use Advanced Tools (Or Hire Someone Who Has Them)
I invested in renting a few advanced tools, but you can also hire a leak detection specialist. Heres what worked for me:
-
Electronic Leak Detection Equipment: These tools use sound to pinpoint leak locations. I was surprised how accurate it was.
-
Thermal Imaging Camera: Helped visualize temperature changes across the floorgreat for spotting warm water leaks.
-
Slab Moisture Meters: If you're into DIY, this tool is a must for verifying moisture buildup beneath your slab.
Step 3: Confirm Before You Cut
One mistake I almost made? Jackhammering too soon. Triple-check the leak location before cutting into concrete. I cross-verified with both thermal imaging and audio detection to avoid an unnecessary mess.
Helpful Tips
-
Dont delay: Water damage gets worse fast.
-
Turn off your water if you're sure theres a leak.
-
Document everything: Useful for insurance claims.
-
Call a pro if the tools feel overwhelmingsome jobs are just better left to the experts.
Common Mistakes to Avoid
-
Ignoring early warning signs
-
Relying on only one method of detection
-
Skipping professional help when its clearly needed
Lets Chat!
Have you dealt with a slab leak? What tools or methods helped you? Share your experience in the commentsId love to learn from you, too.
FAQs About Slab Leak Detection
Q: How can I tell if I have a slab leak without tools?
A: Look for warm floors, mysterious puddles, and rising water bills. These are your first red flags.
Q: Is slab leak detection covered by homeowners' insurance?
A: It depends on your policy. The repair may be covered, but detection and damage might not be. Always check the fine print.
Q: Can I fix a slab leak myself?
A: Possibly, if it's minor and youre experienced. But honestly? I recommend calling in a proits your homes foundation were talking about!
Q: How much does slab leak detection cost?
A: Typically between $150$500, depending on your location and the complexity of the job.